


Although it's hard to tell in these compressed images, I improved the lighting, made many of the lights (especially in the pit area) "bright," and made the textures more-accurately match the "Star Wars" movies.
Here's another comparison, this time between a reference photo from "The Empire Strikes Back" (1st picture, below) and the latest version of our Star Destroyer Bridge (2nd picture, below -- it's the same picture as above, but I included it again here for an easier side-by-side comparison):

Again, it's hard to see details in these compressed images -- it's a lot better seeing full-size images. But overall, hopefully our new-and-improved model looks more 3D and realistic.
Here are before-and-after comparisons of the alcove part of the bridge:


Again, it's hard to see the changes in these compressed images, but hopefully the "after" picture looks more 3D. If you look carefully at the surfaces, especially the door detailing and the long, vertical, chrome panels on the upper-right side of the screen, you can see them reflecting other parts of the bridge. Most of the other surfaces have some degree of reflection as well, but it's hard to see in this picture.
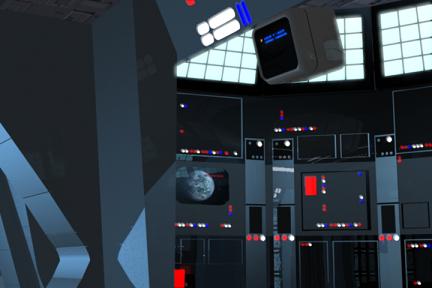
I also improved the detailing on the control panel (right side of the picture). Before, it was just a picture of random controls, but now there are actual, 3D controls on the panel. The reason is because we have close-up shots that required more detailed surfaces. For example:


In the old version the blue and white buttons on the bottom-right of the picture were just low-resolution pictures, but in the new version they're actual 3D buttons. I also replaced those yellow lights with blue lights, since reference photos from the "Star Wars" movies showed that Imperial Star Destroyer bridges do NOT have yellow lights -- they're only red, white, and blue.
Here's that same alcove, from a different angle:


Without going into details, hopefully the general sense you get from looking at the 2 pictures is that the "after" picture looks more 3D and realistic, whereas the "before" picture looks more CG and fake.
Here's another comparison of a different part of the alcove:

Again, if you look at the surfaces, you can see that most of them are reflective to some degree. You can see it particularly well if you look at the monitor on the top-right of the picture, the screen showing the planet in the middle of the picture, and those long, vertical, chrome panels on the bottom-right of the picture.
Here's a different part of the Star Destroyer bridge:


Here's where you can really see the difference in the texture mapping on the walls. If you look at this reference picture from "The Empire Strikes Back" (it's the same part of the bridge as above, but from a different angle), you can see that the walls have a fairly flat appearance, not all bumpy and panel-y like in our "before" picture, above.

You can also see the glass that I added to our windows (picture, above), which may have been included in a previous blog post -- I can't remember.
Here's the last before-and-after comparison, from the same part of the bridge, but looking to the right in a close-up:


Same as before -- flatter, non-panely walls and more reflective surfaces (look especially at the bottom-right of the picture -- you can see the other part of the bridge reflected in the black panel).
I think my next challenge will be improving the texture maps in Bibble's Bar. However, it may be a few weeks before my next post because texture mapping is VERY time-consuming so I don't know how long it will take...
Later,
Bob


Your models and locations look very good. How long have you been animating and what tools do you use?
ReplyDeleteI have some of my own at my blog,
http://phantompic.blogspot.com/
Thank you. We've been animating on a part-time basis since 2005. None of us has any formal training or experience with film-making or CG, so there's been a lot of learning curve to absorb. We use 3D Studio Max for modeling, After Effects for our special effects (chromakeying, compositing, etc.), and Premiere Elements for editing.
ReplyDeleteIt looks like you're working on a similar project. Good luck!
Thanks,
Bob